Baby Rainbow Sampler Blanket (part 6)
15.Oct.20 / Kirsten BalleringMaterials and preparation
See part 1 for yarn and hook requirements.
Yarn
Notes
- Don't forget: Blue colour codes are for the Rainbow version!
Abbreviations (US Terms)
- popc: 6dc in same stitch, remove hook from loop, insert hook from front to back through first dc, pick up loop, pull through dc to close popcorn
- hdc: half double crochet
- ch: chain
- ss: slip stitch
- RS: Right side
- WS: Wrong side
- dc: double crochet
- ch-space: chain space: the space below the chain of the previous row. The same goes for ch-2 space, ch-3 space etc.
- st(s): stitch(es)
Repeat formats
- *….; rep from * once/twice/3x Crochet the instructions after * and then repeat that section a further number of times as indicated.
- (…) once/twice/3x Crochet the instructions between brackets the total number of times indicated.
- […] Indicates the amount of stitches at the end of a row or round.
- (…) in same st/sp Indicates that all instructions between brackets are worked in the same stitch or space.
Colour layout

Techniques
Popcorns
Click here for the tutorial about the popcorn stitch. You can ignore the instructions about colour changes, because we’ll be working the popcorns in one colour this time.
Granny Clusters
Click here for the tutorial about granny clusters.
Crochet pattern
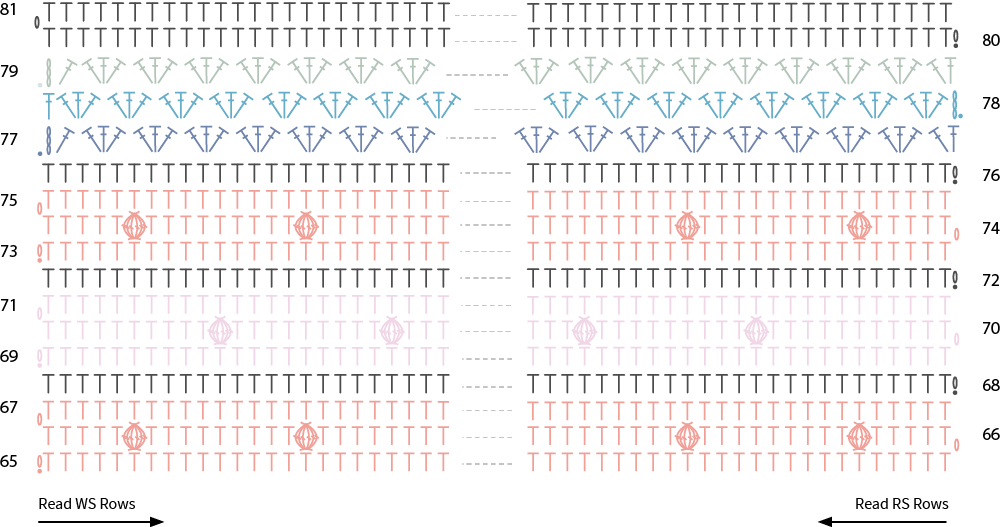
Popcorn section 2 (rows 65-76)
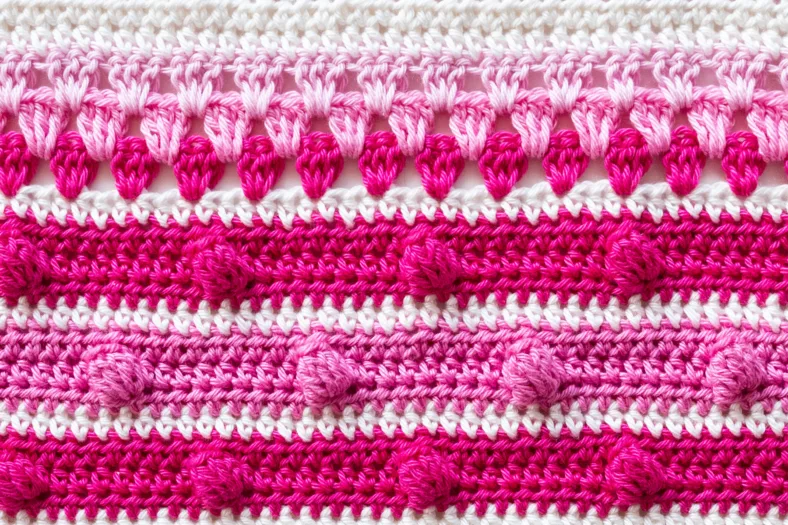
We’ve worked popcorns before, right at the start of the blanket. However, this time we’ll be working the popcorns in the same Colour as the base row. They might not stand out as much visually, but that means that it’s all about the texture. Plus, the pattern is much easier to read without all those colour changes.
Row 65 (WS) Join Colour T (M) with ss in first st, ch1, 1hdc in same st, 144hdc, ch1, turn. [145 hdc]
Row 66 (RS) 7hdc, *1popcorn, 9hdc; repeat from * another 12 times, 1popcorn, 7hdc, ch1, turn. [14 popcorns, 131 hdc]
Row 67 (WS) 145 hdc, cut yarn, turn. [145 hdc]
Row 68 (RS) Join Colour A with ss in first st, ch1, 1hdc in same st, 144hdc, cut yarn, turn. [145 hdc]
Row 69 (WS) Join Colour I (L) with ss in first st, ch1, 1hdc in same st, 144hdc, ch1, turn. [145 hdc]
Row 70 (RS) 12hdc, *1popcorn, 9hdc; repeat from * another 11 times, 1popcorn, 12hdc, ch1, turn. [13 popcorns, 132 hdc]
Do you see how the popcorns are exactly aligned in between the popcorns of Row 66? That is because we’ve allowed for an uneven number in between the popcorns, which means there is an actual centre stitch (stitch no. 5). And because we’ve worked both rows from the same (right) side, the stitch placement is exactly the same, something that wouldn’t have been the case if you worked popcorns on a WS row. So if you ever create a blanket with a popcorn pattern, be sure to make all your bobble stitch rows on the same side. I always solve this by adding 1 row of ‘plain’ stitches (such as hdc’s or dc’s) in between bobble rows. Hello, beautiful geometry!
Row 71 (WS) 145hdc, cut yarn, turn. [145 hdc]
Row 72 (RS) Join Colour A with ss in first st, ch1, 1hdc in same st, 144hdc, cut yarn, turn. [145 hdc]
Row 73 (WS) Join Colour M with ss in first st, repeat Row 65. [145 hdc]
Row 74 (RS) Repeat Row 66. [14 popcorns, 131 hdc]
Row 75 (WS) Repeat Row 67. [145 hdc]
Row 76 (RS) Join Colour A with ss in first st, ch1, 1hdc in same st, 144hdc, cut yarn, turn. [145 hdc]
Granny Cluster section 3 (rows 77-81)
The Granny clusters are back! You got this, right?
Row 77 (WS) Join Colour U (M) with a ss in first st, ch3 (counts as first dc), 1dc in same st, *skip 2 sts, 3dc in next st; repeat from * another 46 times, skip 2 sts, 2dc in last stitch, cut yarn, turn. [47 Granny clusters with 3 dc, 2 clusters with 2 dc, 145 dc in total]
Row 78 (RS) Join Colour Q (N) with a ss in first st, ch3 (counts as first dc), *3dc in first space between clusters of previous row; repeat from * another 47 times, 1dc in third ch of begin-ch3 of previous row. Cut yarn, turn. [48 Granny clusters with 3 dc, 2 dc, 146 dc in total]
Row 79 (WS) Join Colour D (O) with a ss in first st, ch3 (counts as first dc), 1dc in first space between clusters, *3dc in next space between clusters; repeat from * another 46 times, 1dc in final space, 1dc in third ch of begin-ch3 of previous row. Cut yarn, turn. [47 Granny clusters with 3 dc, 2 clusters with 2 dc, 145 dc in total]
Row 80 (RS) Join Colour A with a ss in first st, ch1, 1hdc in same st, 1hdc in each of the next 144 sts, ch1, turn. [145 hdc]
Row 81 (WS) 145hdc, cut yarn, turn. [145 hdc]
Continue to part 7 of the pattern.
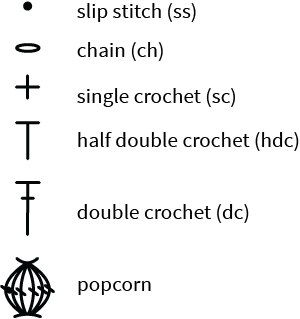
Diagram
Diagram part 6
Key part 6

Comments
Be the first to comment to this post!